The following comes from William Noyes’s 1910 classic, Handwork in Wood. See the whole Handwork in Wood series here.
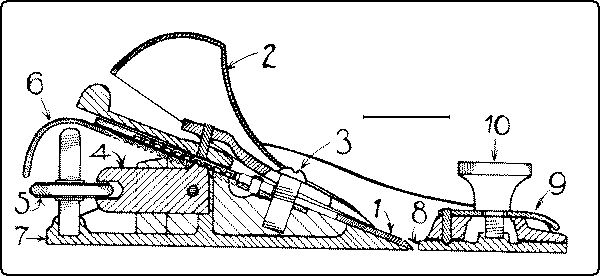
The block-plane, Fig. 108, gets its name from the fact that it was first made for planing off the ends of clap-boards, a process called “blocking in”.
The names of the parts of the Bailey block-plane are:
1. Cutter or bit or plane-iron.
2. Clamp or lever cup.
3. Cap-screw.
4. Adjusting lever.
5. Adjusting nut.
6. Lateral adjustment.
7. Bottom.
8. Mouth piece.
9. Eccentric plate.
10. Knob.
The block-plane was devised for use with one hand, as when it is used by carpenters in planing pieces not readily taken to a vise or in planing with a bench-hook. Hence it is made small, 3½” to 8″ long, the clamp is rounded so as to act as a handle, and the cutter is lowered to an angle of about 20° to make the plane easy to grasp. The lower angle of the cutter makes it necessary that the bevel be on the upper side. Otherwise, to give clearance, the bevel would have to be made so long and so thin as to be weak. By putting the bevel up, the angle between the wood and the cutter is maintained practically as in the smooth-plane. Since the block-plane is intended chiefly for use on end grain, no cap is needed to break the shavings. The adjustable throat makes it possible to cut a very fine shaving. To facilitate the cutting action, several forms of block-planes with a very low angle are now made.
Where both hands are free to hold the plane, the block-plane has no advantage over a smooth-plane, even on end grain. Moreover, the cutter cannot be held so firmly in place as that of a smooth-plane, so that it requires constant adjustment. Hence it is not an easy tool for amateurs to handle. There is considerable lost motion in the adjusting nut, and the set-screw, which acts as a knob, is likely to work loose and be lost. It is hardly to be recommended as a part of the equipment of the individual bench in school shops.
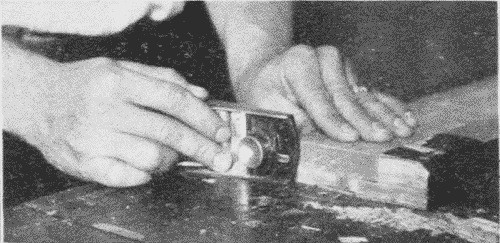
The piece to be planed with the block-plane may be held either in the vise, end up, or on a bench-hook, Fig. 109. In end planing in the vise, in order to avoid splintering the precaution should be taken to trim off a corner on the undressed edge…or else the planing must be done from both edges toward the center. The sliding cut is much easier than the straight cut, and hence there is a constant temptation to turn the plane at an angle perhaps at an expense of the flat surface desired.
In using the bench-hook the piece to be block-planed is placed with the working edge against the block, with the end to be planed to the right and flush with the edge of the bench-hook, in which position it is held with the left hand. The block-plane, held in the right hand, is placed on its side on the bench facing toward the work. In planing, the left hand holds the work firmly against the block of the bench-hook, pressing it somewhat to the right against the plane. The right hand holds the side of the plane flat on the bench and presses it to the left against the bench-hook and work. Held in this position the plane is pushed forward and back until the end is smoothed. Considerable practice is necessary to handle the block-plane well.
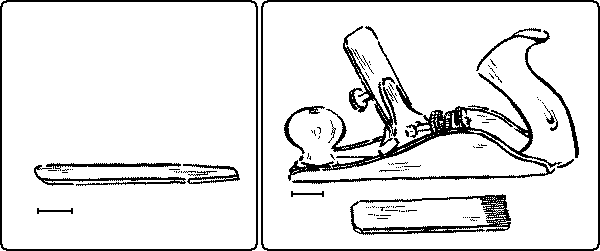
The scrub-plane is a short plane in which the crown of the cutter, Fig. 110, is quite curved. It is used to reduce surfaces rapidly.
The scratch-plane, Fig. 111, has a toothed cutter which scratches fine lines along its course. It is used to roughen surfaces of hard wood which are to be glued together, for otherwise the glue would not adhere well. Some tropical woods are so hard that their surfaces can be reduced only by a scratch-plane. It is also useful in preparing the surface of a very cross-grained piece of wood which cannot be planed without chipping. By first scratching it carefully in all directions, it can then be scraped smooth. It is also called a scraper-plane, because accompanying the plane is a scraper which can be inserted in the same stock and inclined at any required angle. This plane-stock prevents the scraper from unduly lowering some portions of the surface. See also veneer-scraper.
The rabbeting- or rebating-plane, Fig. 112, is designed for use in cutting out a rectangular recess, such as the rabbet on the back of the picture-frames. In line with the right hand corner of the cutter is a removable spur to score the wood so that the shaving which follows may be cut out clean and not torn out. With the addition of a guiding fence it is called a filletster. This may be used on either the right or left side. In the form shown in Fig. 112, there is also a depth gage.
In using this plane see that the corner of the cutter is in line with the sole, and that both it and the spur are sharp. Set the fence and the stop at the desired width and depth of the rabbet. At the first stroke the spur will score the width. This and every stroke should be taken as evenly and carefully as if it were the only one. In the effort to keep the fence pressed close to the side of the wood, the tendency is to tilt the plane over. This causes the very opposite effect from that desired, for the spur runs off diagonally, as in Fig. 114.
If this happens stop planing at once, clean out the recess properly with a chisel and then proceed.
The dado-plane is much like the rabbeting-plane, except that it is provided with two spurs, one at each side of the cutting edge, to score the wood before cutting.
The molding-plane, Fig. 113, as it name indicates, is for making moldings of various forms; as, quarter-round, half-round, ogee, etc.
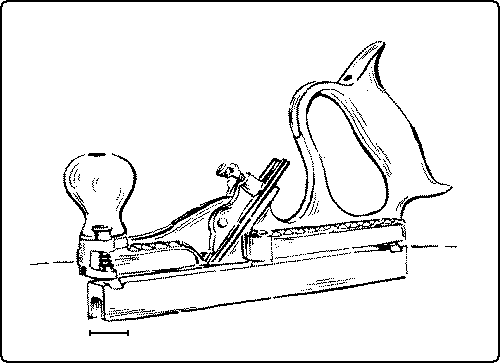
The tonguing-and-grooving-plane, Fig. 115, is for matching boards, i. e. making a tongue in one to fit into a groove in another.
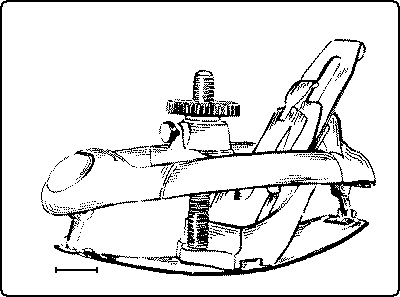
The circular-plane, Fig. 116. has a flexible steel face which can be adjusted to any required arc, convex or concave, so that curved surfaces may be planed.
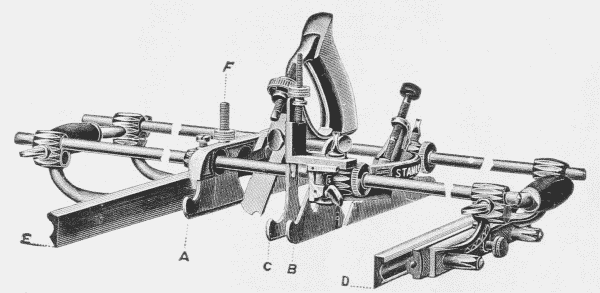
The universal plane, Fig. 117, is a combination of various molding-, rabbeting-, matching- and other planes. It is capable of many adjustments and applications. The principal parts of this plane are: a main stock, A, with two sets of transverse sliding arms, a depth-gage, F, adjusted by a screw, and a slitting cutter with stop, a sliding section, B, with a vertically adjustable bottom, the auxiliary center bottom, C, to be placed when needed in front of the cutter as an extra support or stop. This bottom is adjustable both vertically and laterally. Fences, D and E. For fine work, fence D has a lateral adjustment by means of a thumb-screw. The fences can be used on either side of the plane, and the rosewood guides can be tilted to any desired angle up to 45°, by loosening the screws on the face. Fence E can be reversed for center-beading wide boards. For work thinner than the depth of the fence, the work may overhang the edge of the bench and fence E be removed. An adjustable stop, to be used in beading the edges of matched boards, is inserted on the left side of the sliding section B. A great variety of cutters are supplied, such as: molding, matching, sash, beading, reeding, fluting, hollow, round, plow, rabbet, and filletster. Special shapes can be obtained by order.
The Use of the Universal Plane. Insert the proper cutter, adjusting it so that the portion of it in line with the main stock, A, will project below the sole the proper distance for cutting.
Adjust the bottom of the sliding section, B, so that the lowest portion of the cutter will project the proper distance below it for cutting. Tighten the check nuts on the transverse arms and then tighten the thumb-screws which secure the sliding section to the arms. The sliding section is not always necessary, as in a narrow rabbet or bead.
When an additional support is needed for the cutter, the auxiliary center bottom, C, may be adjusted in front of it. This may also be used as a stop.
Adjust one or both of the fences, D and E, and fasten with the thumb-screws. Adjust the depth-gage, F, at the proper depth.
For a dado remove the fences and set the spurs parallel with the edges of the cutter. Insert the long adjustable stop on the left hand of the sliding section. For slitting, insert the cutter and stop on the right side of the main stock and use either fence for a guide.
For a chamfer, insert the desired cutter, and tilt the rosewood guides on the fences to the required angle. For chamfer beading use in the same manner, and gradually feed the cutter down by means of the adjusting thumb-nut.
There are also a number of planelike tools such as the following:
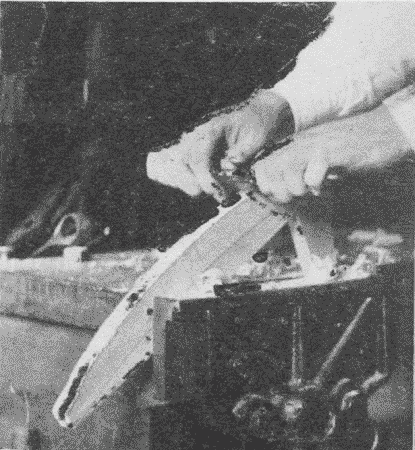
The spoke-shave, Fig. 118. works on the same principle as a plane, except that the guiding surface is very short. This adapts it to work with curved outlines. It is a sort of regulated draw-shave. It is sometimes made of iron with an adjustable mouth, which is a convenient form for beginners to use, and is easy to sharpen. The pattern-makers spokeshave, Fig. 119, which has a wooden frame, is better suited to more careful work. The method of using the spokeshave is shown in Fig. 120.
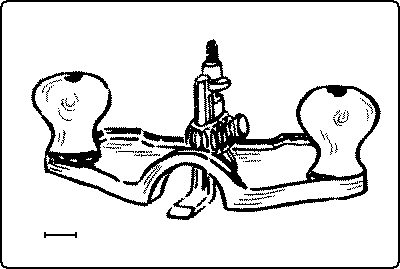
The router-plane, Figs. 121 and 122, is used to lower a certain part of a surface and yet keep it parallel with the surrounding part, and it is particularly useful in cutting panels, dadoes, and grooves. The cutter has to be adjusted for each successive cut. Where there are a number of dadoes to be cut of the same depth, it is wise not to finish them one at a time, but to carry on the cutting of all together, lowering the cutter after each round. In this way all the dadoes will be finished at exactly the same depth.
The dowel-pointer, Fig. 123, is a convenient tool for removing the sharp edges from the ends of dowel pins. It is held in a brace. The cutter is adjustable and is removable for sharpening.
The cornering tool, Fig. 124, is a simple device for rounding sharp corners. A cutter at each end cuts both ways so that it can be used with the grain without changing the position of the work. The depth of the cut is fixed.
Noyes, W. (1910). Chapter IV. WOOD HAND TOOLS. In Handwork in Wood (pp. 69-77). Peoria, Ill.: Manual Arts Press
Learn all about planes and more online here at the Heritage School of Woodworking’s Online Woodworking Courses, especially the free Using a Hand Plane video. To see the router plane in use, see our Cutting a Stopped Dado lesson. If you want to learn how to sharpen a plane, take the Sharpening a Hand Plane class. Be sure to check out the Log to Spoon Course; it’s got lots of spokeshaving!





Comments are closed.